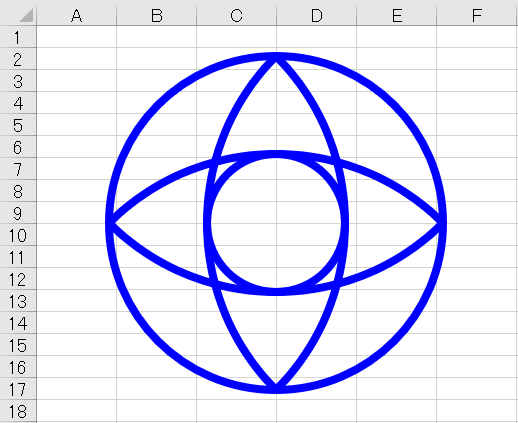
円と弧円の組み合わせで描く。
円を描く
中心と半径を決めてオートシェイプを作る。Option Explicit '線のデフォルトカラーと太さ。 Const LINE_BOLD As Long = 5 Const LINE_COLOR As Long = vbBlue 'オートシェイプ円の作成。 '円の中心と半径からオートシェイプの作成位置を計算。 Function makeShapeOval(ws As Worksheet, sX, sY, iRadius, _ Optional iLineColor As Long = LINE_COLOR, _ Optional iLineBold As Long = LINE_BOLD) As Shape Dim x As Double: x = sX - iRadius '円の開始位置 Dim y As Double: y = sY - iRadius '円の開始位置 Dim iDiameter As Double: iDiameter = iRadius * 2 '直径 Dim myShape As Shape Set myShape = ws.Shapes.AddShape(msoShapeOval, x, y, iDiameter, iDiameter) With myShape .Line.Weight = iLineBold .Line.ForeColor.RGB = iLineColor '外枠 .Fill.Visible = msoFalse '塗りつぶし無し '.Fill.ForeColor.RGB = iForeColor '塗りつぶし色 End With Set makeShapeOval = myShape End Function 'オートシェイプ直線の作成。ついでに作った。 Function makeShapeLine(ws As Worksheet, sX, sY, eX, eY, _ Optional iForeColor As Long = LINE_COLOR, _ Optional iLineBold As Long = LINE_BOLD) As Shape Dim myShape As Shape Set myShape = ws.Shapes.AddLine(sX, sY, eX, eY) With myShape.Line .Weight = iLineBold .ForeColor.RGB = iForeColor End With Set makeShapeLine = myShape End Function
円状にオートシェイプを配置
円の大きさを決めて、円弧部分の座標を計算する練習。幾何学模様を作るのに、そのまま使える。
'X座標計算用。
Function Coord_X(deg As Integer) As Double
    Dim pi As Double, dx As Double
    pi = WorksheetFunction.pi() '円周率
    dx = Cos(deg * pi / 180)
    Coord_X = dx
End Function

'Y座標計算用。
Function Coord_Y(deg As Integer) As Double
    Dim pi As Double, dy As Double
    pi = WorksheetFunction.pi() '円周率
    dy = Sin(deg * pi / 180)
    Coord_Y = dy
End Function
Sub テスト_放射状に線を描く()

    Dim ws As Worksheet
    Set ws = ThisWorkbook.Worksheets("テスト")

    '中心点を決める
    Dim iCenterLeft As Integer
    Dim iCenterTop As Integer
    iCenterLeft = Range("D12").Left
    iCenterTop = Range("D12").Top

    Dim 始点x As Double, 始点y As Double
    Dim 終点x As Double, 終点y As Double

    Dim i As Integer
    For i = 0 To 359 Step 3 '度
        始点x = Coord_X(i) * 0 + iCenterLeft
        始点y = Coord_Y(i) * 0 + iCenterTop
        終点x = Coord_X(i) * 100 + iCenterLeft
        終点y = Coord_Y(i) * 100 + iCenterTop
        Call makeShapeLine(ws, 始点x, 始点y, 終点x, 終点y)
    Next

End Sub
上記プログラムのベタ打ち値を変えればいろいろ作れる。楕円ぽい形も作れる。

扇形を作る
中心位置と半径、中心角と回転(角度の開始と終了)を決める。扇形ぽく点を配置して、点と点を直線か曲線で結ぶ。
弧円部分は曲線で結び、弧円の終端と中心角は直線で結ぶ。
やることが多い。
'座標格納用。
Type dot
    x As Double
    y As Double
End Type

'フリーフォーマット形式で扇形のオートシェイプを作成する。
Function makeSector(ws As Worksheet, iCenterLeft, iCenterTop, iRadius, sAngle, eAngle, _
                Optional blnSector As Boolean = False, _
                Optional iForeColor As Long = LINE_COLOR, _
                Optional iLineBold As Long = LINE_BOLD) As Shape

    Dim myShape As Shape
    Dim ffb As FreeformBuilder

    Dim dx As Double, dy As Double
    Dim dotList() As dot
    Dim iDotCount As Integer

    Dim angle As Integer
    Dim apex As Integer

    apex = 15 '頂点の数のテスト値。

    Dim i As Integer
    For i = 0 To apex

        angle = i * (eAngle - sAngle) / apex
        dx = iCenterLeft + Coord_X(sAngle + angle - 90) * iRadius '-90で上を開始位置に調整
        dy = iCenterTop + Coord_Y(sAngle + angle - 90) * iRadius '同様

        iDotCount = iDotCount + 1
        ReDim Preserve dotList(1 To iDotCount)
        dotList(iDotCount).x = dx
        dotList(iDotCount).y = dy

    Next

    '取得した点を曲線で繋げる。
    For i = LBound(dotList) To UBound(dotList)

        dx = dotList(i).x
        dy = dotList(i).y

        Select Case i

        Case LBound(dotList)
            Set ffb = ws.Shapes.BuildFreeform(msoEditingAuto, dx, dy)

        Case LBound(dotList) + 1, UBound(dotList), UBound(dotList) - 1
            '最初と最後だけ直線で繋ぐと違和感少なめ。
            ffb.AddNodes msoSegmentLine, msoEditingAuto, dx, dy

        Case Else
            ffb.AddNodes msoSegmentCurve, msoEditingAuto, dx, dy

        End Select

    Next

    '扇形の直線部分は円弧の先端と円の中心を最後に繋ぐ。
    If blnSector Then
        ffb.AddNodes msoSegmentLine, msoEditingAuto, iCenterLeft, iCenterTop
        i = LBound(dotList)
        dx = dotList(i).x
        dy = dotList(i).y
        ffb.AddNodes msoSegmentLine, msoEditingAuto, dx, dy
    End If

    Set myShape = ffb.ConvertToShape '作成

    With myShape.Line '線
        .DashStyle = msoLineSolid '実線
        .Weight = iLineBold
        .ForeColor.RGB = iForeColor
    End With

    With myShape.Fill '塗りつぶし
        .Visible = msoFalse '無し
        '.ForeColor.RGB = iForeColor
    End With

    Set makeSector = myShape

End Function
その他、必要なヤツ
'ランダム名取得。オートシェイプに任意の名前を付けたい。
'エクセルがオートシェイプの名前を自動的に割り振ってくれるので実は要らない。
Function RandomName() As String
    With CreateObject("Scripting.FileSystemObject")
        RandomName = Replace(.GetTempName, ".tmp", "")
    End With
End Function

'描画部品の名前を保管。グループ化で使う。
'配列を1つ増やして追加する。
Sub ShapeNameArray(arr, s)
    On Error GoTo add1
    Dim i As Integer: i = 0
    i = UBound(arr)
add1:
    i = i + 1
    ReDim Preserve arr(1 To i)
    arr(i) = s
End Sub
各部品の配置場所を計算して設置
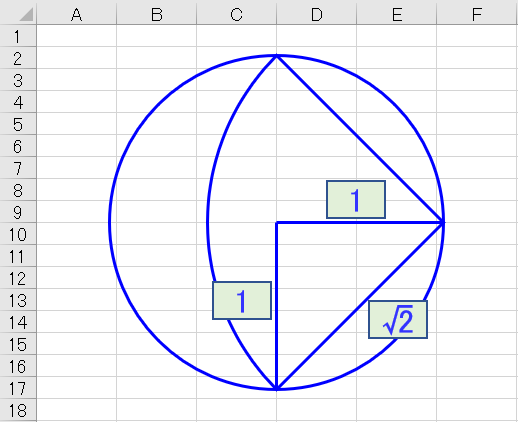
円弧の配置場所を計算する。
・正方形の対角線の比率は1:1:√2。
・外側の円の半径を1とした時、円弧の半径の比率は√2。
・円弧の中心位置は外側の円上の4か所、90度刻み。
中央の小さい円は、円弧の半径-外側の円の半径で求まる。
上記を計算しながらオートシェイプを配置。
Sub ベームベーム()

    Dim ws As Worksheet
    Set ws = ThisWorkbook.Worksheets("テスト")

    Dim centerCell As Range
    Dim coreDot As dot '中心点
    Dim outDot As dot '外周上の点を格納
    Dim myShape As Shape
    Dim arrName() As String

    Dim mainCircleSize  As Double: mainCircleSize = 100
    Dim tempCircleSize As Double: tempCircleSize = 0

    Set centerCell = Range("D10")
    coreDot.x = centerCell.Left
    coreDot.y = centerCell.Top
    Set myShape = makeShapeOval(ws, coreDot.x, coreDot.y, mainCircleSize, rgbBlue)
    myShape.Name = "外周1"
    Call ShapeNameArray(arrName, myShape.Name)

    '外周の円サイズを計算
    outDot.x = coreDot.x + Coord_X(0) * mainCircleSize
    tempCircleSize = (outDot.x - coreDot.x) * Sqr(2) '1:1:√2

    Dim i As Integer
    For i = 0 To 359 Step 90 '度
        outDot.x = coreDot.x + Coord_X(i) * mainCircleSize '外周の点を取得
        outDot.y = coreDot.y + Coord_Y(i) * mainCircleSize '外周の点を取得
        Set myShape = makeSector(ws, outDot.x, outDot.y, tempCircleSize, i - 45 - 90, i + 45 - 90, False)
        Call ShapeNameArray(arrName, myShape.Name)
    Next

    Set myShape = makeShapeOval(ws, coreDot.x, coreDot.y, tempCircleSize - mainCircleSize, rgbBlue)
    myShape.Name = "内周1"
    Call ShapeNameArray(arrName, myShape.Name)

    ws.Shapes.Range(arrName).Group.Name = "ベームベーム1"

End Sub
作った後は普通のオートシェイプと同様に線の色や太さ、点線変更できる。
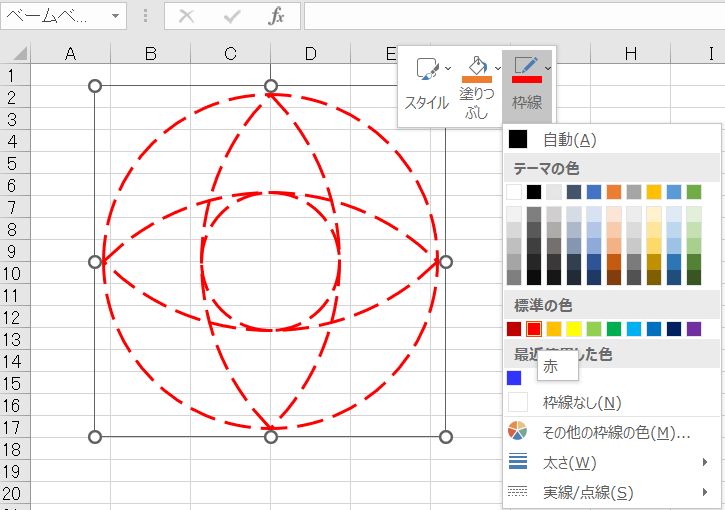
以下はstep値だけ変えたもので、左から80度、60度、10度。

以上。